


By Sean Tinney October 16, 2025
Your Webflow web site attracts guests. E mail advertising turns these guests into prospects, subscribers, and repeat patrons.
Most individuals who land in your web site aren’t able to buy instantly. They’re researching, evaluating choices, or simply beginning to perceive their downside. E mail provides you the chance to remain related with these guests after they go away, nurture the connection, and be there after they’re able to take motion.
As soon as your e mail platform is added, it really works robotically—welcoming new subscribers, sending focused content material, and changing browsers into patrons when you concentrate on different elements of what you are promoting.
Why Webflow Websites Want E mail Advertising and marketing Integration
When somebody visits your Webflow web site and leaves, you’ve misplaced your likelihood to speak except they arrive again. E mail captures that chance by providing you with a direct line to individuals who’ve proven curiosity in what you provide.
In contrast to social media the place algorithms management visibility, or paid adverts that cease when your funds runs out, e mail places you in management. Webflow e mail integration requires a third-party platform as a result of Webflow focuses solely on web site constructing.
Easy methods to Set Up E mail Advertising and marketing on Webflow with AWeber
The combination takes lower than an hour with AWeber.
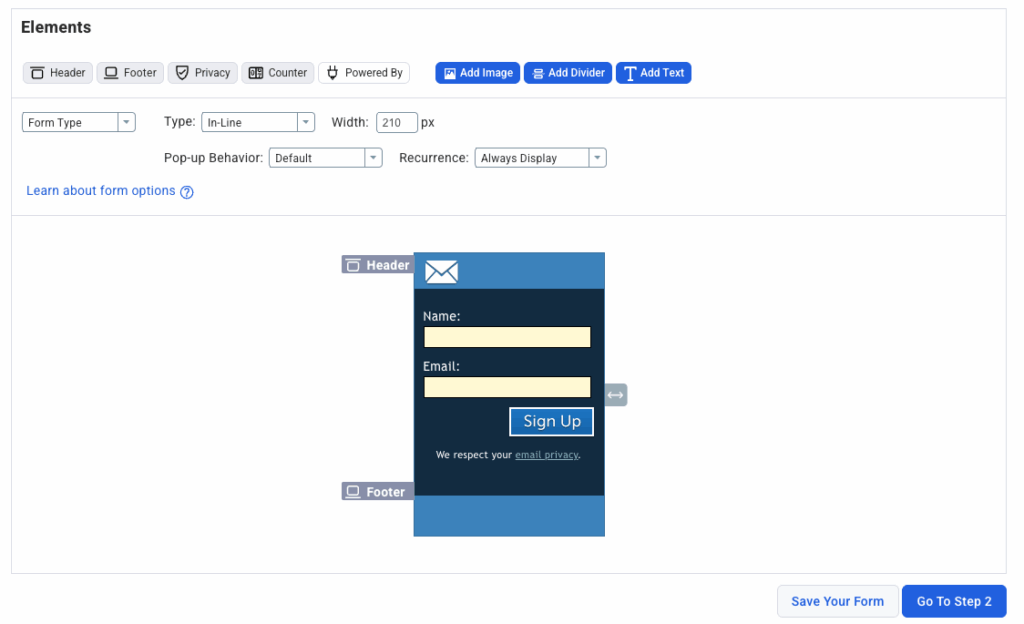
Step 1: Create Your Signup Type in AWeber
Join AWeber and navigate to the signup types part. Select a kind template or create one from scratch utilizing the drag-and-drop builder. Customise the fields you need to gather—usually identify and e mail deal with work finest. Study extra about rising your e mail checklist with strategic kind placement.
Step 2: Get Your Embed Code
As soon as your kind is prepared, click on “Publish” and choose “Embed on Web site.” AWeber generates a code snippet to your kind. Copy this embed code—you’ll paste it into your Webflow pages.
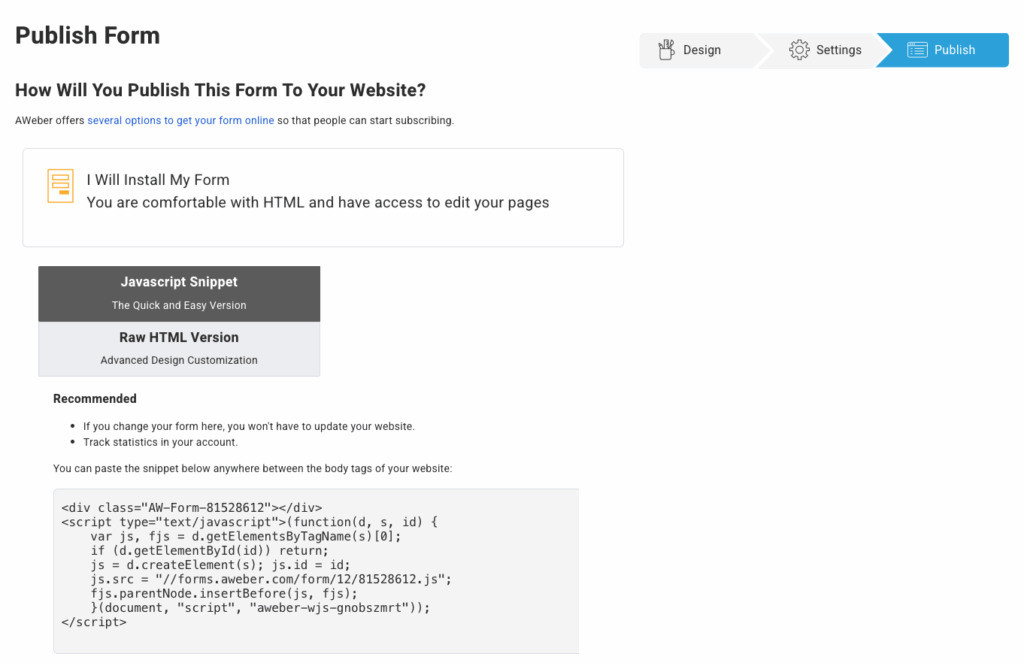
Step 3: Add the Type to Your Webflow Pages
In your Webflow Designer, drag an “Embed” aspect onto the web page the place you need your signup kind to look. Paste the AWeber embed code into the customized code area. Publish your Webflow web site to make the shape reside.
Add types to a number of pages for max visibility—weblog posts, homepage, about web page, and repair pages all work properly.
Step 4: Construct Your Welcome Automation
Navigate to AWeber’s automation part and create a brand new workflow. Set your set off to “Subscriber joins checklist.”
Create a 3-email welcome sequence:
E mail 1 (Quick): Welcome subscribers and set expectations
E mail 2 (Day 2-3): Share your most respected useful resource
E mail 3 (Day 5-7): Invite them to take the subsequent step
Use AWeber’s drag-and-drop e mail builder to design messages. Our AI Writing Assistant generates topic traces and replica immediately.
Step 5: Take a look at Every little thing
Earlier than going reside, check the whole course of. Submit your Webflow kind utilizing a check e mail deal with. Confirm the subscriber seems in your AWeber checklist, verify that your welcome automation triggers appropriately, and make sure all three emails ship on the proper intervals.
Make any needed changes earlier than selling your kind to actual guests.
Greatest Practices for Webflow E mail Advertising and marketing
Place Varieties Strategically
Most guests arrive at particular weblog posts or service pages from Google, not your homepage. Place e mail signup types on each web page. Take a look at end-of-post types, exit-intent pop-ups, inline types, and sidebar types.
Tag Subscribers Based mostly on Their Actions
Tags are labels you connect to subscribers based mostly on their habits, letting you ship focused content material to particular teams.
You possibly can tag subscribers based mostly on:
- Type submissions: Tag by which kind they stuffed out (weblog signup vs. session request)
- Lead magnet downloads: Tag by which useful resource they requested
- Hyperlink clicks: Tag subscribers who click on particular hyperlinks in your emails
- Web page visits: Tag based mostly on which Webflow pages they visited earlier than subscribing
- Buy habits: Tag prospects individually from prospects
AWeber’s tagging system applies these segments robotically whenever you configure your types and automations.
Take a look at Key Variables
Small enhancements compound over time. A/B testing can enhance e mail efficiency by 49% or extra. Take a look at one variable at a time to establish what drives outcomes.
What you’ll be able to check:
Topic traces: Curiosity-driven vs. benefit-driven. Personalised vs. generic. Quick (beneath 40 characters) vs. longer headlines.
Ship occasions: Morning (8-10am) vs. afternoon (1-3pm) vs. night (6-8pm). Completely different days of the week to your particular viewers.
Name-to-action placement: Above the fold vs. finish of e mail. Button vs. textual content hyperlink. “Get Began” vs. “Obtain Now” vs. “Study Extra.”
E mail size: Quick (100-200 phrases) for bulletins. Longer (500+ phrases) for instructional content material.
Sending frequency: Begin weekly, enhance to twice weekly if engagement stays sturdy, lower if open charges drop.
Steadily Requested Questions About Webflow E mail Integration
Can I join a number of Webflow types to totally different e mail lists in AWeber?
Sure. Join every kind to a selected checklist, or ship all types to 1 grasp checklist with totally different tags. Single lists with tags provide extra flexibility for segmentation.
Can I customise the affirmation message after somebody submits a Webflow kind?
Sure, however that is managed in Webflow’s kind settings, not AWeber. Customise Webflow’s success message whereas AWeber handles e mail affirmation and welcome automation.
Begin Changing Webflow Site visitors into E mail Subscribers
It’s time to start out capturing extra leads out of your Webflow web site? Join AWeber and create your first skilled e mail signup kind as we speak. Our drag-and-drop builder, mobile-responsive templates, and 24/7 assist make it easy to start out rising your e mail checklist—no technical expertise required.